
🧩 3.1 Pumps and Pipettes#
🔰 Tutorial#
In this module, you will develop software to:
Manage a peristaltic pump’s operations using a microcontroller and motor driver
Manipulate the linear actuator of the Digital Pipette
Control a stepper motor for precise positioning
Manage fan speed for temperature control in laboratory equipment
These skills are fundamental in creating automated liquid handling systems for various scientific applications.
Peristaltic Pump#
First, you will manage a peristaltic pump’s operations using a microcontroller and motor driver. Consider purchasing the hardware and setting it up yourself to enhance the experience. Hardware is optional for the completion of this module.
Bill of Materials#
Adafruit Terminal PiCowbell for Pico with Pre-Soldered Sockets
12V Peristaltic Pump (alternative: 5V peristaltic pump, but requires sufficient 5V power supply | optional: silicone tubing)
12V 3A power supply (alternative: 12V 1A version)
Alligator clip to female jumper wire pack (only 2 required)
M/F silicone jumper wires (non-silicone also OK, only 4 required)
Mini flathead screwdriver set (one for DC Motor driver terminals and a smaller one for PiCowbell terminals)
Soldering kit (for bare wires to peristaltic pump connections)
[OPTIONAL] Plastic beakers
[OPTIONAL] Blue food coloring
Peristaltic pumps are the workhorses of many laboratories! 🏋️♀️ They’re used for precise liquid handling in various applications:
🧪 Transferring chemicals in analytical chemistry
🦠 Moving culture media in microbiology
💊 Dispensing precise volumes in pharmaceutical research
🌱 Delivering nutrients in hydroponics systems
Fun fact: The pump’s mechanism mimics the peristalsis of your digestive system! 😮
Demo#
✅ Read the MDD3A DC Motor Driver datasheet
Understanding the motor driver is crucial for controlling the pump effectively.
✅ Read PWM
Pulse-Width Modulation (PWM) is a key technique for controlling motor speed in many applications.
✅ Read Control LED brightness with PWM
This tutorial provides a practical introduction to PWM control.
✅ Read machine.PWM
Understanding the MicroPython PWM API is essential for implementing motor control.
Use your knowledge, the documentation above, and any relevant datasheets to set up the circuit to control the peristaltic pump. After setting up the hardware, run the following code on the microcontroller (ensure you select the appropriate PWM Pin):
from machine import Pin, PWM
from time import sleep

pwm = PWM(Pin(0))

pwm.freq(1000)

pwm.duty_u16(16384)  # 25% duty cycle
sleep(5)  # 5 seconds

pwm.duty_u16(0)  # stop the motor
You should observe the peristaltic pump turn on for five seconds.
Expanded Applications 🚀#
🍺 Craft breweries use peristaltic pumps for precise ingredient dosing
🏥 In hospitals, they’re crucial for IV drug delivery systems
🌈 They’re even used in fountain displays for creating colorful water shows!
Digital Pipette#
Next, you will control the linear actuator of the “Digital Pipette” to carry out precise dispensing.
Bill of Materials#
Based on ac-rad/digital-pipette
Adafruit Terminal PiCowbell for Pico with Pre-Soldered Sockets
1705 Pcs Machine Screw Assortment Kit, M2 M3 M4 M5. Only the following are needed:
M3 10 mm screws (3)
M3 20 mm screw (1)
M3 nuts (4)
3D printed parts (if you don’t want to print these yourself, STL files can be uploaded to Shapeways, Protolabs Network, Xometry, or similar. You can use white PLA filament)
M/F silicone jumper wires (non-silicone also OK, only 4 required)
Mini flathead screwdriver set (one for regulators and a smaller one for PiCowbell terminals)
Digital pipettes are the unsung heroes of precise liquid handling! 🦸♀️ They’re essential in:
🧬 Molecular biology for DNA/RNA work
🔬 Preparing samples for microscopy
🧫 Setting up PCR reactions
📊 Preparing standard solutions for calibration curves
Did you know? Digital pipettes can be more accurate than traditional glass pipettes, especially for very small volumes! 🎯
Demo#
✅ Read Digital pipette: open hardware for liquid transfer in self-driving laboratories
✅ Read the Digital Pipette GitHub README
Understanding the open-source implementation is crucial for customization and troubleshooting.
AccelerationConsortium/ac-training-lab
Run the following code on your microcontroller:
import utime
from machine import PWM, Pin

# Setup PWM
pwm = PWM(Pin(0))  # Use the appropriate GPIO pin
pwm.freq(50)  # 50 Hz frequency


def set_position(pulse_ms):
    duty = int((pulse_ms / 20.0) * 65535)
    pwm.duty_u16(duty)


# Example to set the actuator to different positions
set_position(1.1)  # Almost full retraction
utime.sleep(5)
set_position(1.9)  # Almost full extension

pwm.deinit()  # Deinitialize PWM
Cool Uses 😎#
🍫 Chocolatiers use them for adding precise amounts of flavoring
🎨 Artists employ them for mixing exact paint colors
🧁 Bakers use them for adding food coloring or extracts in precise amounts
Stepper Motor#
You will use a stepper motor driver to control the position of a stepper motor.
Bill of Materials#
Adafruit Terminal PiCowbell for Pico with Pre-Soldered Sockets
12V 3A power supply (alternative: 12V 1A version)
Mini flathead screwdriver set (one for Tic500 and a smaller one for PiCowbell terminals)
Stepper motors are the precision dancers of the motor world! 💃 They’re used in:
🖨️ 3D printers for precise nozzle movement
🔭 Telescope mounts for tracking celestial objects
🤖 Robotic arms for accurate positioning
📷 Camera systems for smooth panning and tilting
Cool fact: Some high-end watches use stepper motors for moving the hands! ⌚
Demo#
✅ Read specs for Tic500 Stepper Motor Driver
✅ Read Example I²C code for MicroPython
✅ Read datasheet for NEMA 17 Stepper Motor
✅ Browse ticlib GitHub repo
Run the following on your microcontroller:
# Import necessary modules
from machine import I2C
from ticlib import TicI2C, MachineI2CBackend
from time import sleep

# Initialize I2C peripheral and specify the address of the Tic device
i2c = I2C(1)
address = 14

backend = MachineI2CBackend(i2c, address)
tic = TicI2C(backend)

tic.halt_and_set_position(0)
tic.energize()
tic.exit_safe_start()

target_position = 500
tic.set_target_position(target_position)

# Wait until the motor reaches the target position
while tic.get_current_position() != tic.get_target_position():
    sleep(0.1)

tic.deenergize()
tic.enter_safe_start()
Unexpected Applications 🎭#
🎰 Slot machines use them for spinning reels
🎹 Electronic musical instruments for key action
🚗 Some car headlights use them for adaptive lighting systems
Fan Control#
Temperature control is crucial in many lab setups! 🌡️ Fan controllers help in:
🧊 Maintaining precise temperatures in incubators
💻 Cooling sensitive electronic equipment
🔥 Managing heat in chemical reactions
🌿 Controlling airflow in plant growth chambers
Did you know? Some advanced fan controllers can adjust fan speed based on multiple temperature sensors, creating temperature zones! 🌡️🌡️🌡️
Creative Uses 🎨#
🍷 Wine cellars use them for maintaining optimal storage conditions
🎸 Musicians use them in amplifiers to prevent overheating during performances
🏎️ Racing simulators use them to create realistic airflow sensations!
Bill of Materials#
Adafruit EMC2101 I2C PC Fan Controller and Temperature Sensor
Adafruit Terminal PiCowbell for Pico with Pre-Soldered Sockets
High-quality soldering iron (alternative: lower quality kit)
4-pin 5V fan (solder joints may not be great, consider buying an extra; alternative: Raspberry Pi Active Cooler, which may require disassembly, alternative: 4-pin Axial Fan 50x50x15 mm 12V Bare wire, needs to be powered externally with a 12V power supply, adjust connections accordingly)
Stemma QT Quick Adapter (stemma qt female to stemma qt female)
STEMMA QT / Qwiic JST SH 4-pin Cable with Premium Female Sockets (note: you can insert a header pin into two of the female quick adapter sockets to create an ad-hoc Stemma QT to half-male/half-female cable. The makeshift male headers will be used to plug into the Terminal PiCowbell. See image below)
Demo#
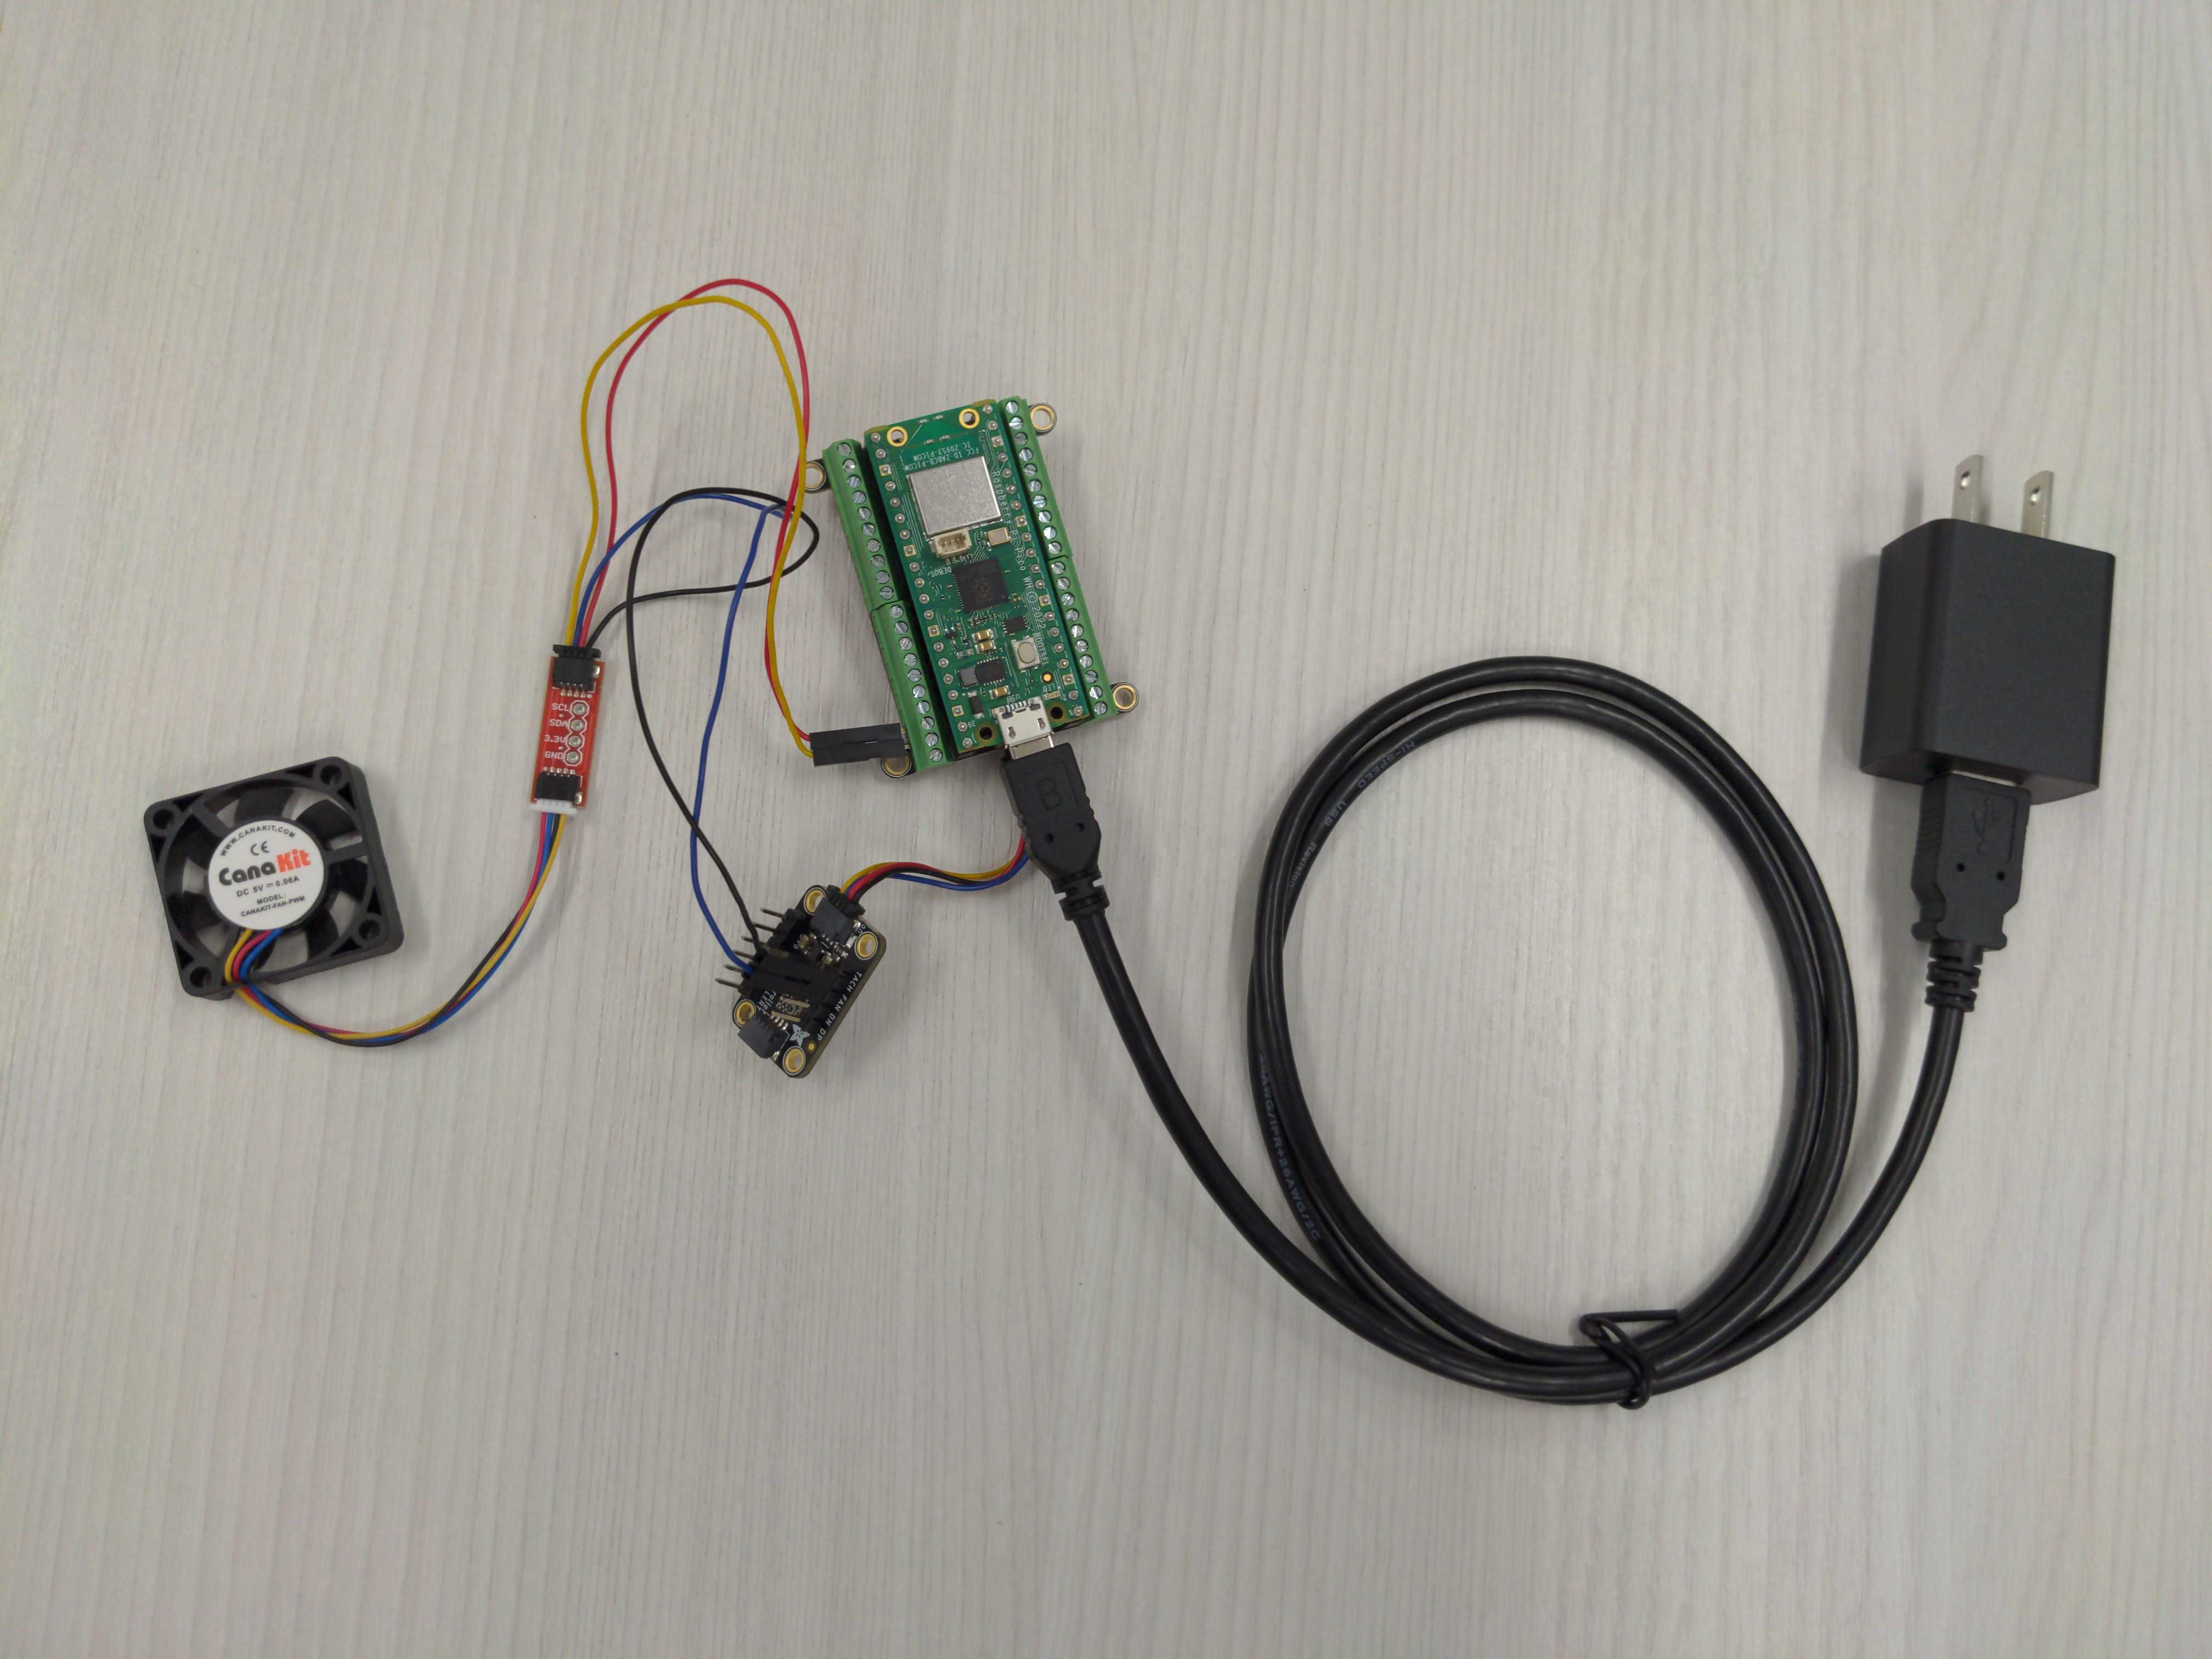
Minimal working example set up of fan control.#
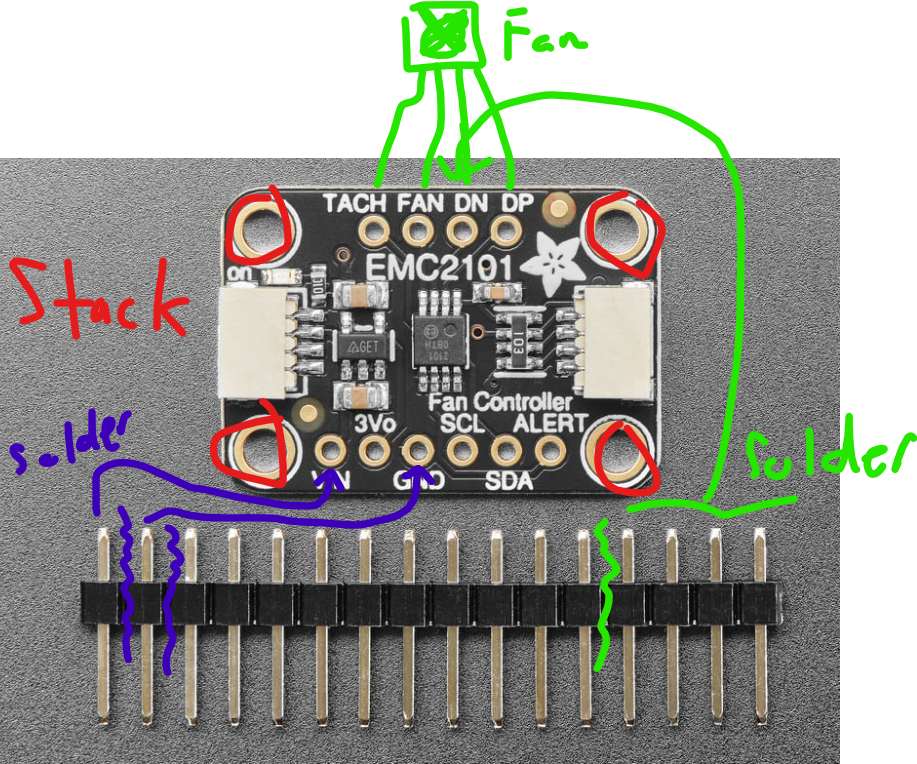
Rough electrical diagram of control board.#
✅ Read Adafruit EMC2101 I2C
✅ View MicroPython_EMC2101
Run the following on your microcontroller:
from machine import Pin, I2C
import time
from EMC2101 import EMC2101

# Constants
PIN_I2C0_SDA = Pin(8)
PIN_I2C0_SCL = Pin(9)
I2C0_FREQ = 400_000
DESIRED_SPEED = 50  # Set desired fan speed percentage (0 to 100)

# Initialize I2C bus
i2c = I2C(0, scl=PIN_I2C0_SCL, sda=PIN_I2C0_SDA, freq=I2C0_FREQ)
print(f"I2C Bus Initialized! Devices found: {i2c.scan()}")

# Initialize fan controller
fan_controller = EMC2101(i2c)
print("Fan controller object created")

# Set fan speed
fan_controller.set_duty_cycle(DESIRED_SPEED)
actual_speed = fan_controller.get_duty_cycle()

print(f"Speed set to {DESIRED_SPEED}%")
print(f"Actual speed is {actual_speed}%")
print(f"Actual RPM is {fan_controller.get_fan_rpm()} RPM")

# Monitor fan speed
while True:
    time.sleep(5)
    print(f"Monitoring Fan:")
    print(f"  Actual speed is {fan_controller.get_duty_cycle()}%")
    print(f"  Actual RPM   is {fan_controller.get_fan_rpm()} RPM")