5. Logging Data
Warning
As a temporary workaround to the issue described in https://github.com/orgs/micropython/discussions/15112, add urequests_2.py [permalink] to your microcontroller, and change import urequests to import urequests_2 as urequests in the code below. See https://github.com/orgs/micropython/discussions/15112 and https://github.com/micropython/micropython-lib/pull/861 for ongoing updates. The corresponding assignment will also be affected, but this can be addressed using the same workaround.
In this tutorial, you will learn how to upload data to a MongoDB database directly from a microcontroller and read data from a database using Python.
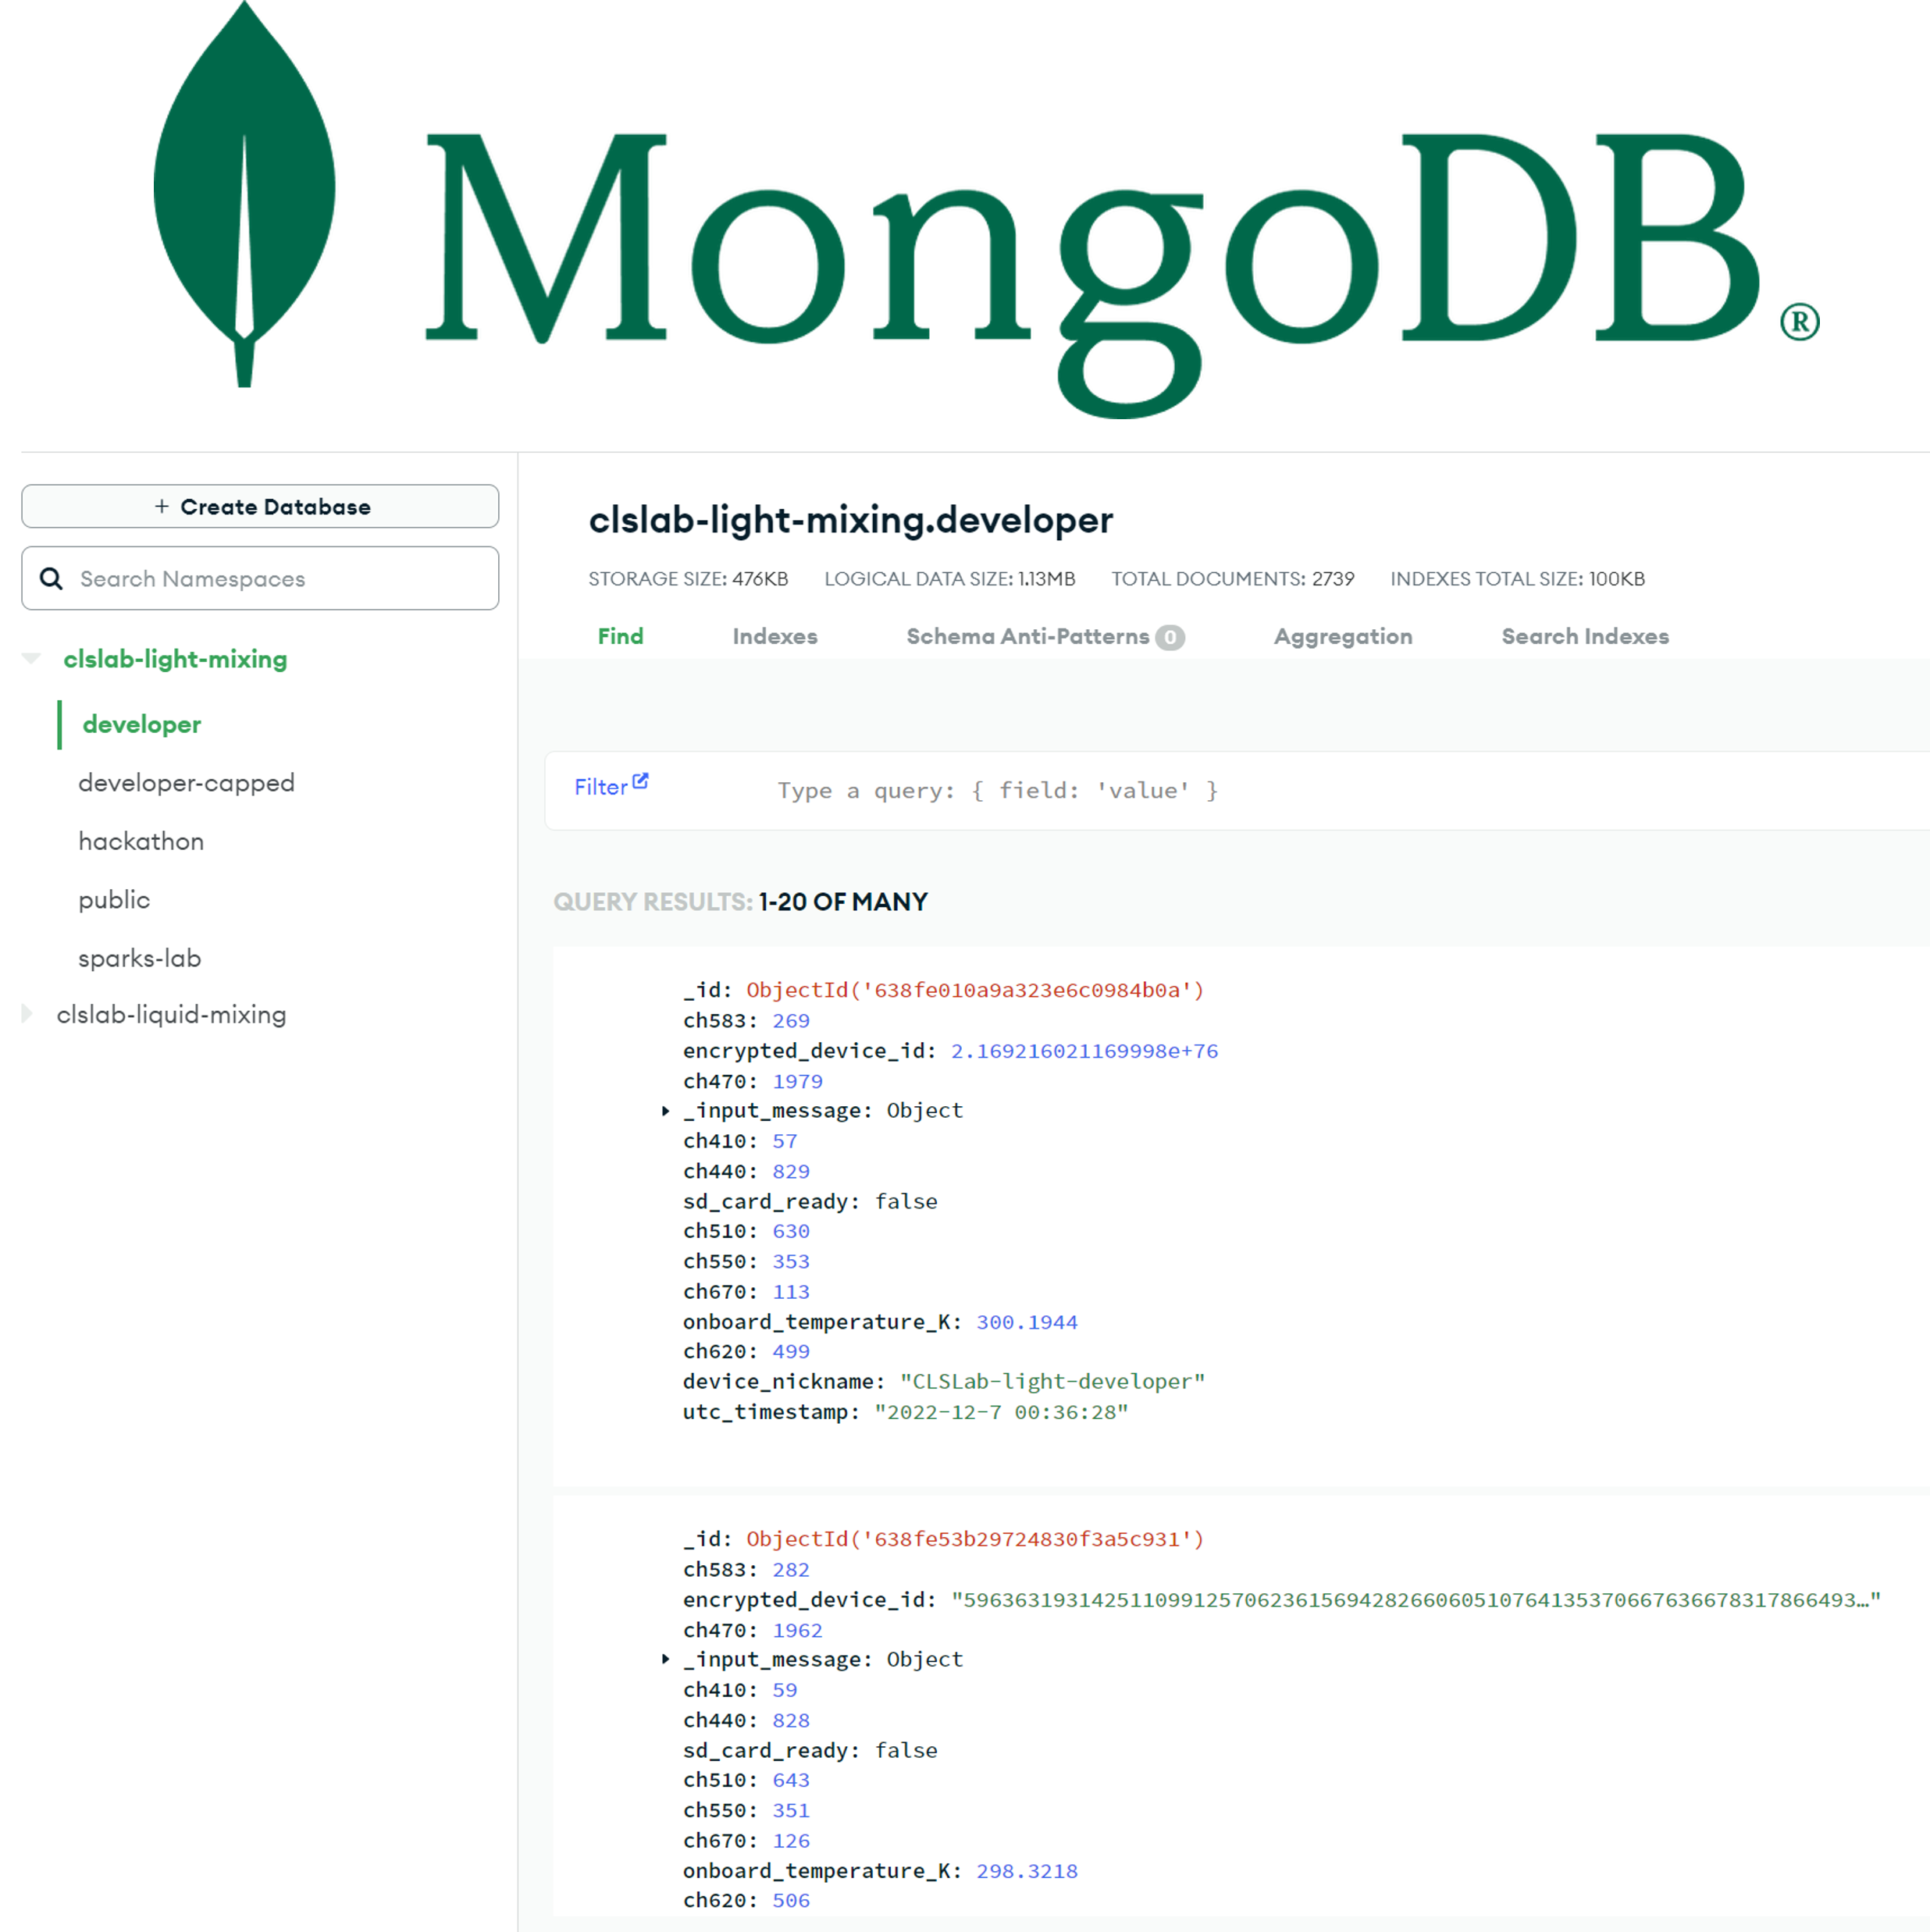
MongoDB database interface for a light-mixing database instance.
FAIR Data
Chemistry and materials research data is precious. By making your data Findable, Accessible, Interoperable, and Reusable (FAIR), you can maximize the impact of your research. Here are two conceptual examples of what FAIR data might look like in the physical sciences:
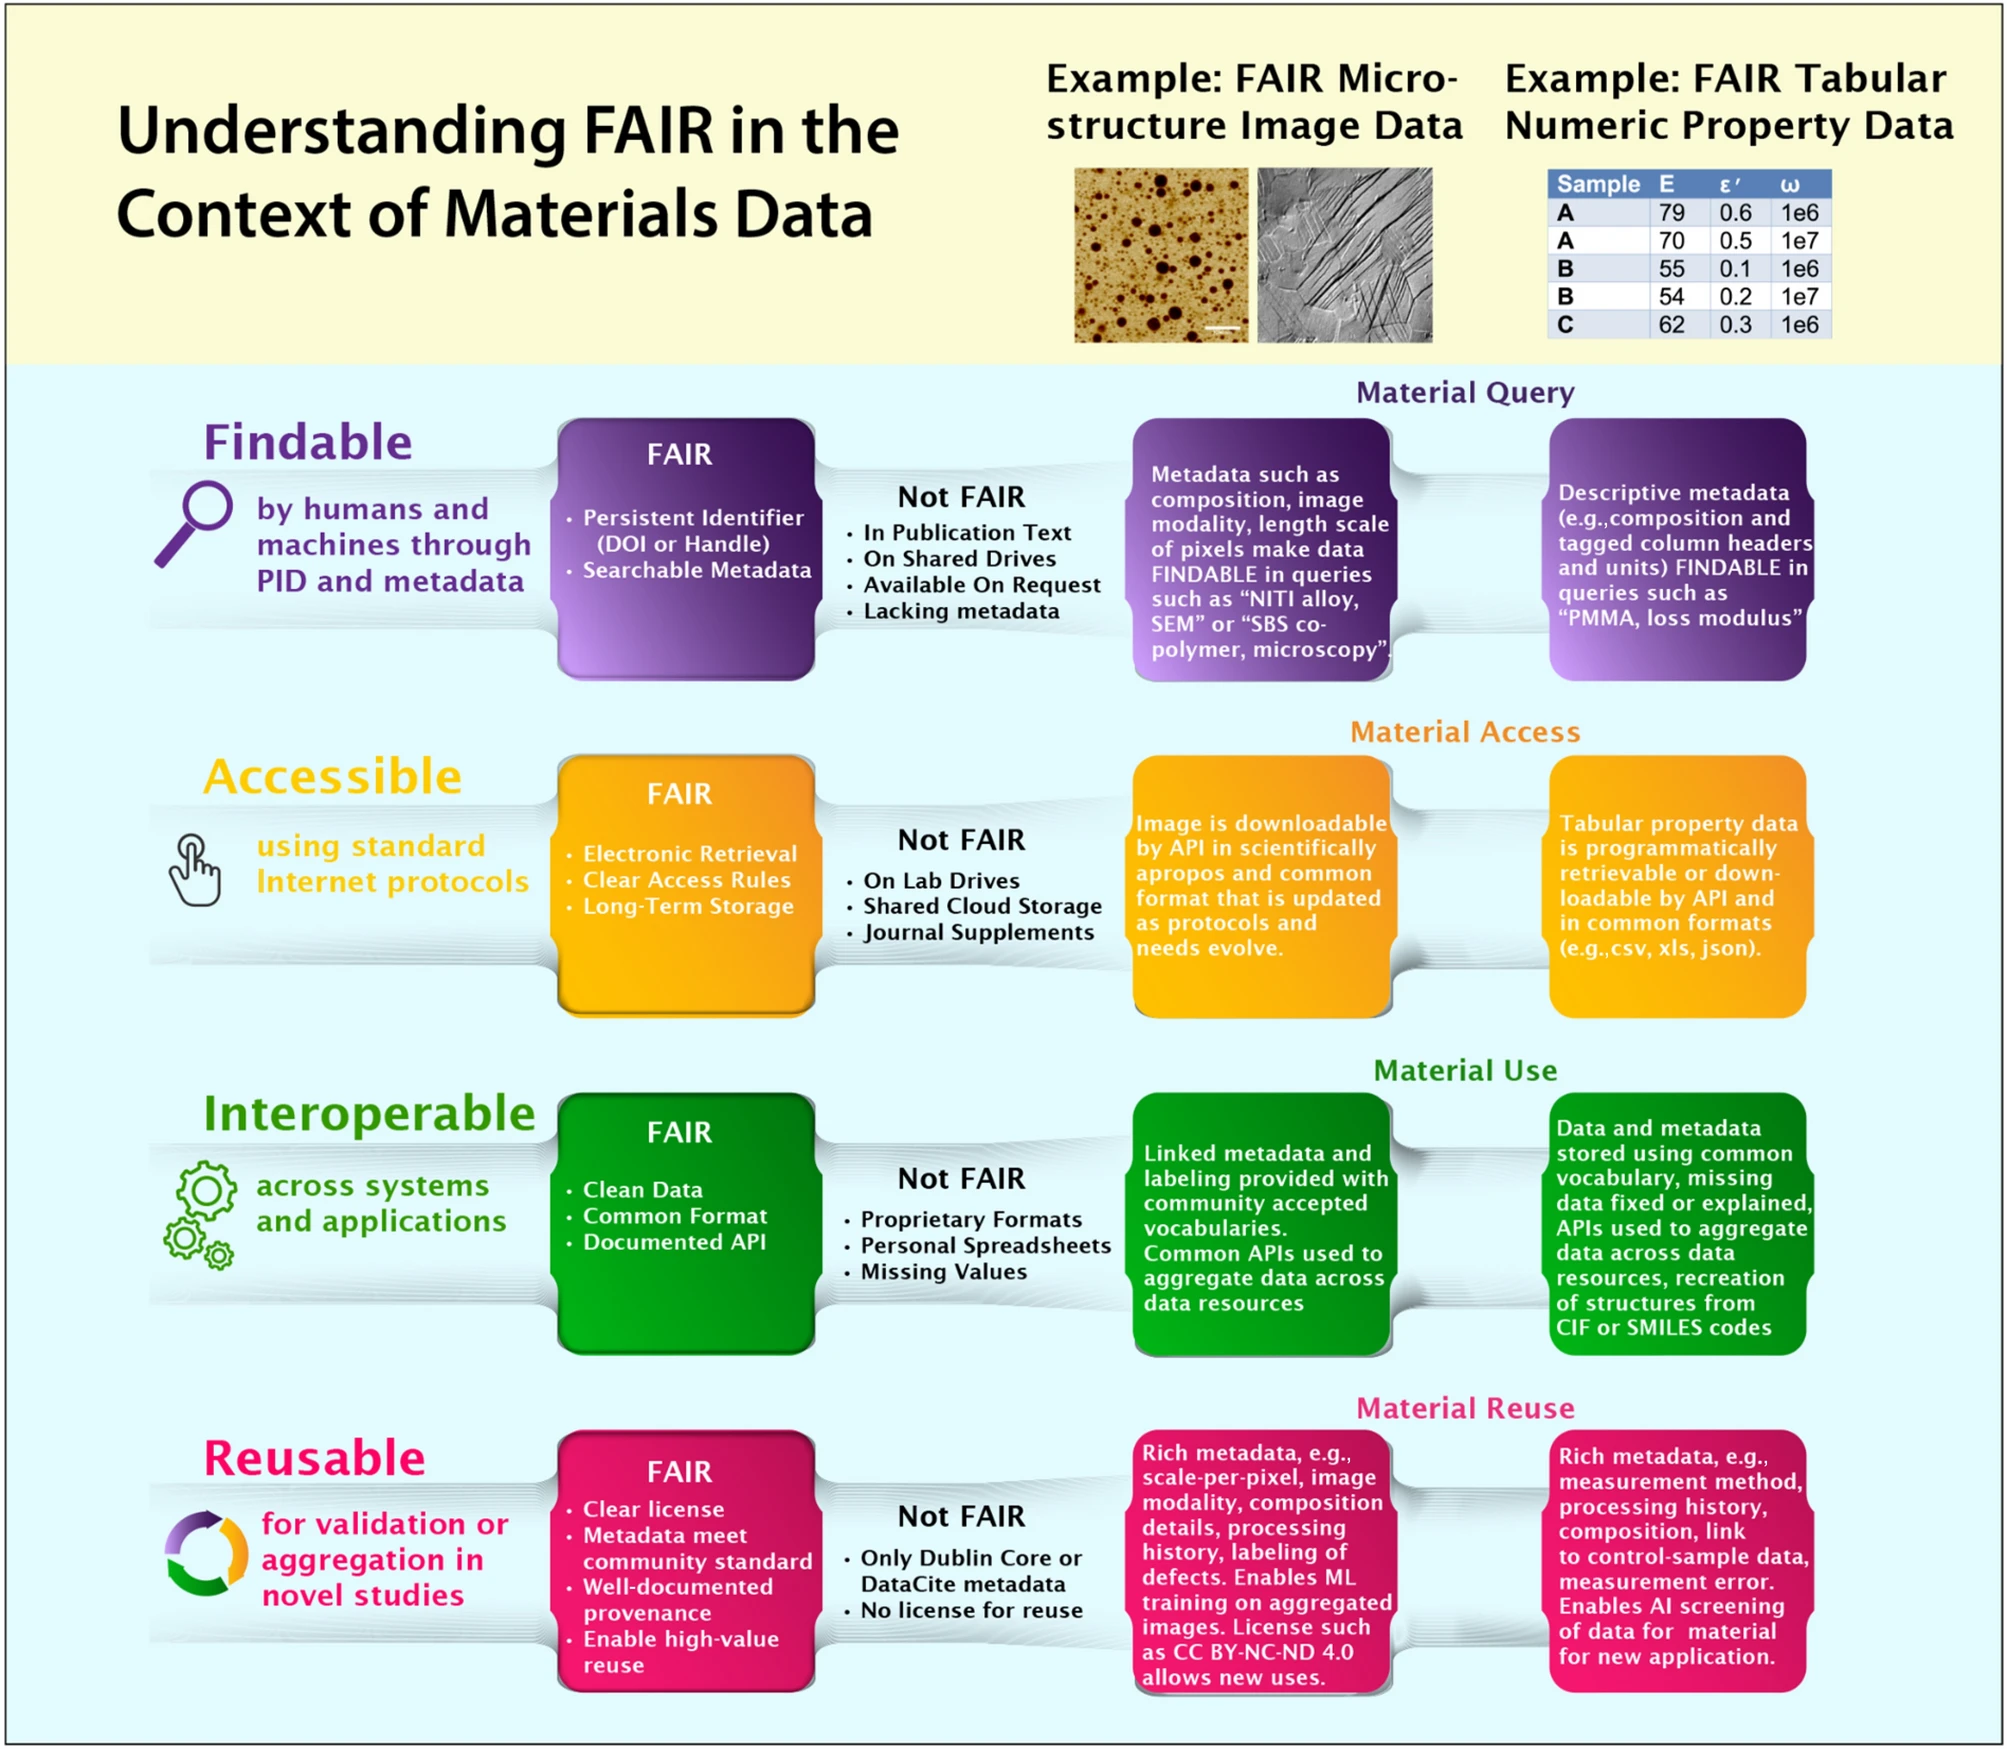
Defining FAIR Data in materials science. Reproduced from https://doi.org/10.1557/s43577-023-00498-4
Writing to MongoDB Using the Data API
For storing our data, we will be using MongoDB, a popular “NoSQL” database. It’s important to note that MongoDB is just one of many excellent choices for databases. It’s a document-oriented database, which means it stores data in JSON-like documents. MongoDB is a popular choice for internet-of-things (IoT) applications due to its ease of setup, use, and scalability. Additionally, MongoDB offers a Data API that allows for direct reading and writing of data from a microcontroller.
For the purposes of this tutorial, we have set up a free-tier test database through MongoDB Atlas. We provide an API key for test purposes. To prevent potential misuse from distributing a public API key (which is generally not a good practice), we have granted only write permissions, and the database is configured to automatically delete entries once a certain storage threshold is reached.
✅ Copy the following code into a new file on the microcontroller called write_mongodb.py and run the file. Note that you will need netman.py [permalink] and a file named my_secrets.py with your WiFi credentials and course ID.
# based on https://medium.com/@johnlpage/introduction-to-microcontrollers-and-the-pi-pico-w-f7a2d9ad1394
from netman import connectWiFi
import urequests

from my_secrets import SSID, PASSWORD, COURSE_ID

connectWiFi(SSID, PASSWORD, country="US")

DATA_API_KEY = "UT4cdinBetBaNqCBc5hISkaArhllv5dWfzXgbYsLYzpv79nqNhVwVsudQU5ZUmBE"  # Public API key for demo purposes only
CLUSTER_NAME = "test-cluster"
DATABASE_NAME = "test-db"
COLLECTION_NAME = "write-to-me"

ENDPOINT_BASE_URL = (
    "https://us-east-2.aws.data.mongodb-api.com/app/data-ibmqs/endpoint/data/v1"
)

endpoint_url = f"{ENDPOINT_BASE_URL}/action/insertOne"

headers = {"api-key": DATA_API_KEY}
document = {"course_id": COURSE_ID}

payload = {
    "dataSource": CLUSTER_NAME,
    "database": DATABASE_NAME,
    "collection": COLLECTION_NAME,
    "document": document,
}

print(f"sending document to {CLUSTER_NAME}:{DATABASE_NAME}:{COLLECTION_NAME}")

num_retries = 3
for _ in range(num_retries):
    response = urequests.post(endpoint_url, headers=headers, json=payload)
    txt = str(response.text)
    status_code = response.status_code

    print(f"Response: ({status_code}), msg = {txt}")

    response.close()

    if status_code == 201:
        print("Added Successfully")
        break

    print("Retrying...")
The output should look something like the following (MAC address and IP address redacted, and your insertedId will be different):
MAC address: ***
connected
ip = ***
sending document to test-cluster:test-db:write-to-me
Response: (201), msg = {"insertedId":"6594bfbfb3c925d2fdfbb7e8"}
Added Successfully
Reading from MongoDB Using PyMongo
✅ Run the code from the companion notebook to read data from a MongoDB database.
Reading Material
✅ Read Community action on FAIR data will fuel a revolution in materials research
✅ Watch the following video about materials databases:
Additional Resources
FAIR data principles website and manuscript
Misc.
awesome-materials-informatics(search for “database”),Materials-Databases(no longer maintained),awesome-chemistry-datasets
As a side note, MongoDB has a “serverless” option (i.e., pay only for what you use) that exceeds the free-tier limits and is more flexible than the shared and dedicated clusters, which may seem appealing at first. However, costs will escalate quickly if the database is not optimized (e.g., the database is not indexed). If you decide to go with MongoDB Atlas for a project and need more than the 512 MB of free-tier storage, we recommend first considering the shared (e.g., M2, M5) and dedicated options, hosting your own MongoDB instance, or looking to other ecosystems. Looking to other ecosystems could be either a full replacement or a supplement. For example, let’s say that one step in your workflow involves capturing images, where the total storage required is on the order of GBs instead of MBs. Instead of saving your images directly to MongoDB (e.g., using GridFS or the BinData type), you can upload your image to Amazon S3 or similar and add the uniform resource identifier (URI) to the corresponding MongoDB document along with other data like sample name, image acquisition parameters, material composition, and processing conditions. The URI can then later be used to programatically access the file from Amazon S3.
Once you’ve successfully finished the example and companion notebook from above and completed the reading material, you are done with this tutorial 🎉. Return to the course website to do a knowledge check.